Snow Leopard (Mac OS X
10.6) has been marketed relatively quietly by Apple - much less
hoopla and emphasis on hundreds of new features than in previous
OS X releases. Instead, it's been made out as mostly a
performance-enhanced (and Intel-only) cleanup of OS X 10.5 "Leopard". Even the name
suggests it's a relatively minor upgrade.
Nicely, Apple's pricing reflects this - US$29, a modest price for a
modest upgrade.
Nevertheless, there are changes to many Snow Leopard features beyond
simply tweaking the code for improved performance or dumping PowerPC
legacy code.
Preview
Take Snow Leopard's Preview: Over multiple OS X versions, this
application has evolved from a fairly straightforward print preview
front-end to a viewer for PDF, JPG, and other file types, gaining in
capability along the way. Recent versions gained the ability to
annotate a PDF, underlining or striking out text or adding notes or
arrows and other shapes. A nice addition in the Leopard version: The
ability to merge pages from various documents by simply dragging pages
from the sidebar of one Preview document into the sidebar of
another.
Not to be sneezed at - performance that's much faster than Adobe
Reader - formerly the standard way to view PDF files.
One improvement of Snow Leopard's version of Preview that Apple is
playing up - the ability to select text in a single column of a
multi-columned PDF document; previously, your selection would span
multiple columns across the page.
Scanner Support
I was pleasantly surprised, though, to find a seemingly unheralded
new feature in Snow Leopard's Preview: scanner support. In the past,
I've tended to find scanners better supported in Windows, where generic
scanner support was built into the operating system and able to be used
in a wide variety of applications.
To make use of my Epson RX620 all-in-one's scan capabilities on my
Mac, I had to use Epson's Scan Utility, installed along with Epson's
proprietary printer drivers. It's a clumsy application, which displays
a 2002 copyright notice and often crashes when shutting down.
So I was pleased that the new Import from Scanner option in the File
menu of Snow Leopard's Preview version seems to make use of scanner
support built right-into Preview - ignoring Epson's utility.
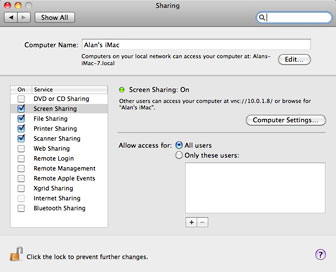 It gets better - my RX620 is connected, via USB, to my
wife's iMac; for a long time, with print sharing enabled in the Sharing
system preference, I've been able to print to it from other Macs around
the house. Snow Leopard's Sharing system preference adds a Scanning
option - another under-advertised feature. With this enabled, Preview's
Import from Scanner becomes even more powerful.
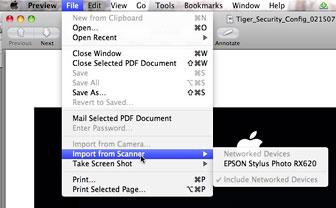 Now, if I'm sitting with my MacBook on my lap - with no scanner
connected - clicking on the Import from Scanner menu item asks me
whether to Include Networked Devices. After clicking that, the RX620
connected to my wife's iMac appears as an option.
And by clicking that, I can control the scanner that's sitting
halfway across the house. Yes, I still need to get up and walk over
there to place the page to be scanned onto the scanner flatbed, but
that's a lot handier than either bringing the laptop over to the
scanner and unplugging it from one system and plugging it into the
other or scanning on the iMac (after getting my wife away from it) and
then either saving the scans to a USB memory stick or emailing them to
myself.
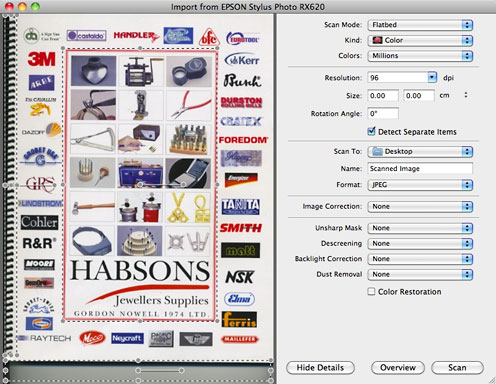
An image imported from a scanner into Preview.
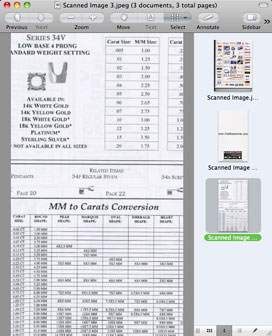 Seemingly nice - if you need to scan a
series of scans, it appears as if Preview displays them, one after the
other, in a single document. Just keep clicking the Scan button in the
window after inserting each new sheet, and watch as multiple pages show
up in Preview's sidebar.
Multiple Documents, Not One
Unfortunately, all is not as it might seem. Note the title bar of
the Preview window in the screen capture. It reads: Scanned Image
3.jpeg (3 documents, 3 total pages). In fact, I ended up with, as it
says, three separate documents on my desktop, each one a single page.
Close the seemingly three page document and reopen it, and it will only
show a single page in the sidebar.
Maybe you recall that I said that under Leopard, you could drag
thumbnails from the sidebar of one Preview window into another, a quick
and easy way to create a new, multipage document. But try that with the
new-and-improved Snow Leopard version and - it doesn't work.
There are two things to be aware of.
- The document opened in your target Preview window needs to be a
PDF-formatted document; if you're working with a set of, say, JPEG
images, you might want to use Preview's File/Save As option to save in
PDF format. (Alternatively, Preview's Scan window lets you scan
directly into PDF). If the target window is already a PDF file, you can
combine multiple pages, even if the other pages are in a different file
format like JPEG - except...
- Unlike the Leopard version, it won't work if you drag the
thumbnails of subsequent pages below the first thumbnail in the
sidebar. Instead, you need to drop one thumbnail directly on top of the
other. (Who thought up this user interface "improvement", Apple? Is
this more logical?) It may take some experimentation to get your pages
in your desired order. Luckily, it's easy to drag your thumbnails up
and down the sidebar to reorder them.
Smaller Files
This can be really handy. Recently, I had to scan a seven page
document and send it off as an email attachment. Sending each page as a
separate attachment is possible, but messier than sending a single
document - much more work for the recipient to read or print.
Before Preview gained its multipage abilities, I might have copied
each scan and pasted it, one after another, into a multipage Microsoft
Word document. The result when I did this with my seven scans was a 16
MB file, pretty large for an email attachment. (It was about the same
size when I saved it as PDF from Word's Print options, and equally
hefty when 'compressed' to ZIP format). The same seven pages, combined
into a multipage PDF in Preview came in at a much slimmer 4.5 MB.
Nice!
Better Screen Shots
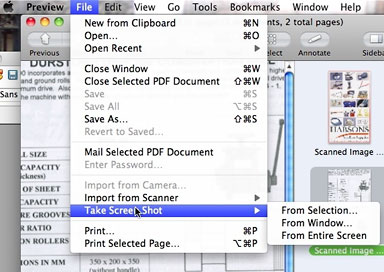 One more quiet addition to Snow Leopard's Preview - right below
the new Import from Scanner menu item, there's a Take Screen Shot menu
item - clicking on that offers options: From Selection, From Window,
and Entire Screen. They work nicely - choosing Selection lets you
select a rectangle onscreen with the cursor, while Window gives you a
camera pointer - click it in the window you want to capture. Selecting
Entire Screen pops up a little timer, giving you about 10 seconds to
get the screen the way you want it to be captured. Whatever option you
choose, you end up with your screen capture in a new Preview window,
letting you save it in any supported file format - PDF, JPEG, etc.
All in all, a big improvement over the classic Mac method of
pressing Command-Shift-3 to capture the whole screen or Command-Shift-4
to capture a selected area. Yes, OS X has included a dedicated
Screen Capture utility ever since Panther - though it seems to be gone
now. In any event, building this capability into Preview seems nice. I
suspect I will continue to use the free SnapNDrag however.
I'm pleased with the quiet addition of scanner sharing in Snow
Leopard and with the new abilities to scan and capture screens in the
new version of Preview. I just wonder why Apple messed with the
straightforward way to make multipage PDFs in the Preview's previous
version. 

 It gets better - my RX620 is connected, via USB, to my
wife's iMac; for a long time, with print sharing enabled in the Sharing
system preference, I've been able to print to it from other Macs around
the house. Snow Leopard's Sharing system preference adds a Scanning
option - another under-advertised feature. With this enabled, Preview's
Import from Scanner becomes even more powerful.
 Now, if I'm sitting with my MacBook on my lap - with no scanner
connected - clicking on the Import from Scanner menu item asks me
whether to Include Networked Devices. After clicking that, the RX620
connected to my wife's iMac appears as an option.
 Seemingly nice - if you need to scan a
series of scans, it appears as if Preview displays them, one after the
other, in a single document. Just keep clicking the Scan button in the
window after inserting each new sheet, and watch as multiple pages show
up in Preview's sidebar.
 One more quiet addition to Snow Leopard's Preview - right below
the new Import from Scanner menu item, there's a Take Screen Shot menu
item - clicking on that offers options: From Selection, From Window,
and Entire Screen. They work nicely - choosing Selection lets you
select a rectangle onscreen with the cursor, while Window gives you a
camera pointer - click it in the window you want to capture. Selecting
Entire Screen pops up a little timer, giving you about 10 seconds to
get the screen the way you want it to be captured. Whatever option you
choose, you end up with your screen capture in a new Preview window,
letting you save it in any supported file format - PDF, JPEG, etc.
