The essential tool for getting inside a compact Mac is a long T-15
Torx screwdriver. The tip must be at least 6" from the handle so you
can reach the recessed screws at the top of the case (way back inside
the Mac's handle). We recommend the Sears Craftsman Professional series
T-15 Torx screwdriver, #47431, as a good choice for about US$4.99.
(Careful, Sears has changed the part number in the past and may do so
again.)
Upgrading Memory
Unless you know you'll be sticking with System 6, upgrade your 8 MHz
Mac to 4 MB of memory. System 7 can run on a 2 MB computer,
but to really take advantage of it, you need more. Even System 6 can
benefit from more RAM, especially if you use MultiFinder or a RAM
Disk.
Mac Plus
Tools required
- long T-15 Torx screwdriver
- small wire cutter (nail clipper may work)
The Plus shipped with
1 MB of memory using four 256 KB SIMMs. Possible configurations
are 1 MB (4 x 256 KB), 2 MB (2 x 1 MB), 2.5 MB (2 x 256
KB and 2 x 1 MB), and 4 MB (4 x 1 MB).
For full instructions on upgrading RAM in your Plus, click here.
Mac SE
Tools required
- long T-15 Torx screwdriver
- small wire cutter may be necessary depending on the motherboard
(nail clipper may work)
The SE shipped with
1 MB of memory using four 256 KB SIMMs. Possible configurations
are 1 MB (4 x 256 KB), 2 MB (2 x 1 MB), 2.5 MB (2 x 256
KB and 2 x 1 MB), and 4 MB (4 x 1 MB).
For full instructions on upgrading RAM in your SE, click here.
Mac Classic
Tool required
- long T-15 Torx screwdriver
The Classic has
1 MB of memory on the motherboard; a second megabyte is added with
a memory card, which has two SIMM sockets. Possible configurations are
1 MB, 2 MB (memory card), 2.5 MB (memory card with 2 x 256
KB), and 4 MB (memory card with 2 x 1 MB).
For full instructions on upgrading RAM in your Classic, click here.
Picking a Hard Drive
If you believe that silence is golden, pick up a Mac Plus, add an
external 800K floppy drive, and skip this section on hard drives.
Everyone else should consider a hard drive essential equipment.
If you have an SE with a
working 20 MB MiniScribe drive, consider it a minor miracle that it's
working after all these years. The old MiniScribe was a decent
performer in 1987, but it's slow and noisy by today's standards. We
strongly suggest you replace it.
The 8 MHz compact Mac trio are the slowest Macs ever made with SCSI,
so there's no need to look for a high performance drive. Pretty much
any drive made since 1990 should provide all the speed any of these
Macs can handle.
The key to picking the right hard drive is capacity. You can use any
capacity SCSI hard drive you can find, although you will have to
partition the drive if you choose something over 2 GB in size.
Odds are you won't be filling up your hard drive with MP3s or huge
Photoshop images; you may find a 40 or 80 MB hard drive is plenty for
your needs. My advice is to find someone who has replaced the drive in
their LC, LC II, or LC III with something even larger. These are
low-power drives compared with what's usually inside the SE , so they will probably reduce the burden on the computer's
power supply. Best of all, you might get the drive for free, since most
people can't imagine using anything that small these days.
We recommend avoiding MiniScribe and Rodime drives, since both
companies are long gone. Our top choices are Quantum and IBM; Conner
and Seagate drives tend to be slower.
You might also want to consider an external hard drive. If you have
a Plus, this is your only option, but even if you don't have a Plus,
the benefit of an external drive is that you can easily move it to
another Mac when you upgrade or just to swap files with a friend.
Installing an Internal Hard Drive
Putting a drive inside an SE or Classic isn't difficult; the
hardest part is getting inside the case. You will want to be careful
working inside any compact Mac - that picture tube can pack a real
jolt, so don't touch it.
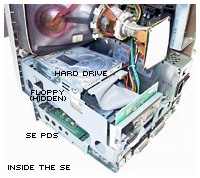
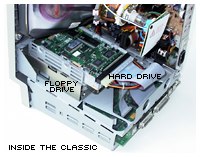
On the SE and Classic, the hard drive sits on top of the floppy. In
both cases, it fits into a bracket. Put the drive into the bracket,
tighten the screws, put the bracket in the computer, screw it in place,
connect the power and SCSI cables, and then close up the case. Very
easy.
Replacing the Battery
Apple has never made it easier to replace Mac batteries than on the
earliest b&w compacts, from the 128K through the Mac Plus. There's
a cover on the back just above the power switch. Remove the cover, and
the battery's just waiting to be replaced. These models use a 4.5V #523
battery.
The SE and Classic have to be disassembled to get to the battery,
which is a bit of a nuisance. On my SE - and I suspect on others as
well - the battery is soldered to the motherboard. (Apple did the same
thing with the Mac II.) I'm not
handy with a soldering iron, so my advice is to find someone who is
comfortable repairing computers and have them install a battery holder
when your battery dies.
The Classic has the same kind of battery holder as most Macs built
since 1989, so you can easily replace the 3.6V lithium battery.
Motherboard Upgrades
Although the SE can be turned into an SE/30 and the Classic into a
Classic II by
replacing the motherboard, we just don't think that makes economic
sense. After all, you can often buy a whole used SE/30 or Classic II
for less than the price of a motherboard upgrade - and then you end up
with two Macs for the price of an upgrade.
If you really want a Classic II or SE/30, we won't discourage you
from going there. But for now, let's get the old 8 MHz Mac running
nicely so you can keep it as a spare or make it available to someone
else.
That's the upgrade overview for the compact Mac trio. The next
chapter looks at choosing the right operating system for your Mac and
your way of working.
Accelerators
Unless you happen to buy a used Plus, SE, or Classic with an
accelerator already installed, it probably doesn't make financial sense
to pick up an accelerator. It's probably less costly to buy a used
SE/30 or Classic II if you just want a faster compact Mac.
Other Links
a


 , so they will probably reduce the burden on the computer's
power supply. Best of all, you might get the drive for free, since most
people can't imagine using anything that small these days.

